
Photoshop: Prep & Color Scanned Drawings
For years now, we have been using and teaching a slightly more powerful approach to digitally coloring scanned sketches/drawings/artwork (art) in Adobe Photoshop. The de-facto technique for coloring scanned art in Photoshop is to switch the document color mode to ‘RGB Color,’ set the blending mode of the layer containing your artwork to ‘Multiply’, and create multiple layers containing color underneath your artwork. What if I told you that a few extra (simple) steps before you picked that first color could make you better, faster & stronger? And what if I gave you an Action to do it?
While there is essentially nothing wrong with the Multiply approach, it falls short with regards to flexibility, speed and creative potential.
The larger pain points being:
- Your artwork layer still has white data in it, and you are not using it. The action of modifying the artwork layer becomes somewhat conflicted: “Do I erase or paint white?”
- What if you want white line-work? or orange? Multiply has you somewhat boxed in here.
- Any fill or action dependent on transparent pixels will fail, as your artwork layer contains no transparent pixels. This leaves you missing out on some pretty substantial & speedy tricks.
- The mess seems to multiply (no pun intended) as you continue to add and color additional artwork layers within the same file.
Setting the blending mode of the layer containing your artwork to Multiply is a seemingly a hacky attempt to separate the parts of the artwork you want, from the parts you don’t. Conveniently, Photoshop has a better solution for this — it’s called Channels and it has been there since the beginning.
Before you start: scan your artwork, and open it up in Adobe Photoshop. Resize if necessary, and if it’s not already there, switch the document image mode to grayscale [Image menu > Mode > Grayscale]. Most scanning software will allow you to scan directly to grayscale.
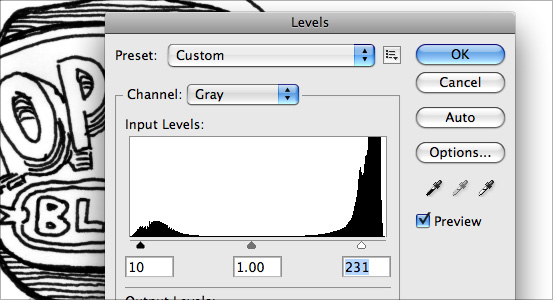
1. First, adjust your Levels [Image menu > Adjustments > Levels]. You want to clean up the lighter areas of the of the scan, removing noise and lighter grays. Adjust the darker end of the levels so that you have some true black information with the greatest possible tonal range in between. Ideally you want to get this right in one go, as your image can get pixelated looking if you keep opening and adjusting Levels. If it’s not right, revert the adjustment (undo) and try again.
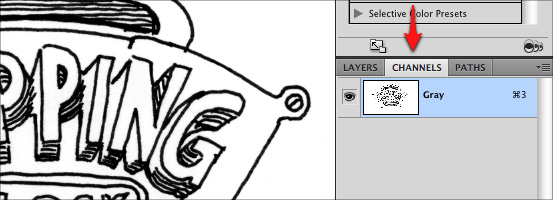
2. Locate the Channels panel [Window menu > Channels], it should look like this… containing one channel named ‘Gray’.
3. The Photoshop-using free world is divided into two camps, those who use Channels, and those who never touch them. Spiritually, Channels represent the tonal values required by each color (or channel) needed to display/print whatever is currently visible on your canvas. Since we are now looking at a grayscale file, there is only one channel and it contains just the tonal values required to draw your stuff.
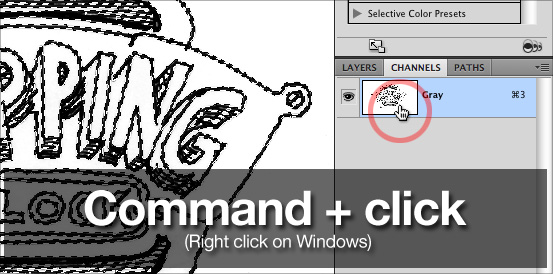
Functionally, all you need to realize is that Channels are essentially constantly updating saved selections, and if you Command click (right click on Windows) on that Channel preview icon you are going to select just the lighter side of the tonal information currently visible on your Canvas.
So command click (right click on Windows) that channel preview icon. You will know things are working if (like the image above) you see the selection/dashed line show up on your canvas.

4. We don’t necessarily want the lighter side of the tonal information we just sampled, we want the darker side, the line work. To accomplish this we will invert the current selection via the [Select Menu > Inverse] command.
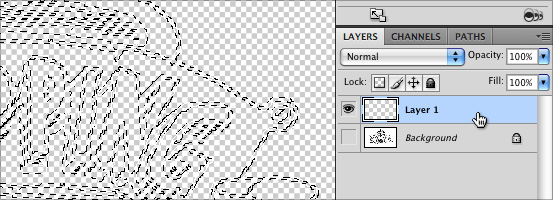
5. So here we are, we have successfully & perfectly sampled just the dark tonal values from our artwork. Now we need to convert the selection on the screen into a new clean layer. We DO NOT want to do anything with the default “Background” layer that is currently selected and active, we want to create a new layer and then turn off the visibility of the original layer. You can do all of this while the selection sits there on your canvas. Note: in order to shy the visibility of the “Background” layer, you first have to create another layer above it.
Before we move forward you want to make sure that the NEW layer is visible and selected (highlighted) in the layers panel (see above).

6. Convert the Photoshop document to RGB (or, CMYK if that’s your fancy) color mode [Image menu > Mode > RGB Color].
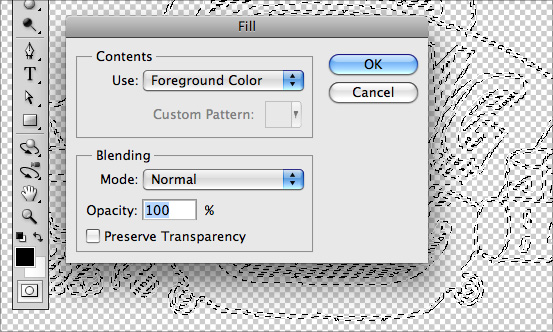
7. The last step is to use the current selection to fill that information into our new layer. You can use any color you want, but black will start you off in a manner that’s identical to the scanned image. There are two ways to fill the using the current selection:
- [Edit Menu > Fill]: Use whatever color you wish, Blending mode Normal, Opacity 100%.
- Option (Alt on Windows) + the Delete Key (two above the Return Key) will fill with the current foreground color, while Command (Control on Windows) + the Delete Key will fill with the current background color. (Those are some powerful keyboard commands – use them for good, not evil.)
Deselect the current selection via [Selection Menu > Deselect].
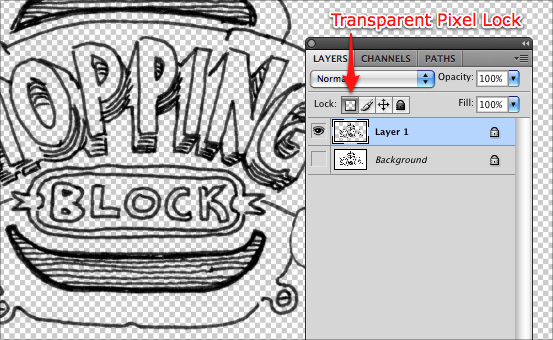
From here, the sky is the limit. What you are looking at is essentially the same starting point you had using Multiply, but with much more potential. As you move forward, here are a few more things to consider:
- By creating a full canvas white layer below your artwork layer, you will be able to better see the full tonal range in your artwork layer.
- If you enable the Transparent Pixel Lock (shown above) on your artwork layer, you can endlessly use the Fill command [Option + Delete] to change the color of your artwork.
- If you need to edit or retouch your artwork layer, just use the Brush & Eraser tools. If you want to mask parts of it out (without destroying it) then use Layer Masks.
- As you create new layers, consider keeping each color separate (layers are free), use that Transparent Pixel Lock / Fill trick to quickly cycle through color options.
- Shadows (black) and Highlights (white) work great on their own layers. This is where using Multiply and other layer blending modes come in real handy with shadows and the blending of color layers.
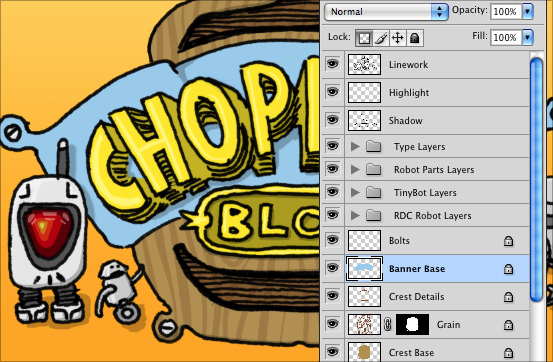
The core Photoshop techniques behind this approach should come in handy quite frequently. Everything shown here was done in Photoshop CS4 but should work identically in the last few versions of Photoshop. With regards to coloring drawings and illustrations, there a few great alternate approaches that take advantage of Adobe Illustrators vector toolset. Leave a note below if you are interested.
Lastly, thanks to the excellent folks at Adobe, most everything Photoshop can do can be recorded in an Action, therefore you can simply download and load up the ‘Prep For Coloring’ action below and accomplish most everything shown above in one click. It works best if you run it on a Grayscale mode image thats fresh off the scanning bed.
- Double click to install or select “Load Actions” from the fly-out menu in your Actions panel.
- Created on a Mac, should work just fine on Windows.
Download: CHOP Illustration Prep Actions

 See more at
Nice tutorial, actually helps me out big time. Much obliged.
This is a great example of the “traditional way” getting punk’d. Awesome job!
This is great. As a paper artist I am now moving to graphics with my drawings. Would like to know about the alternate approaches that take advantage of Illustrator.
This is great– I’d love to know about the alternative approaching using Illustrator, as well. I teach beginning design students, so I try to learn as many methods as I can!
Thanks!
Nicely described. I used to export paths to Illustaror, but now I mostly adjust the levels and use Trace Image, or whatever that button says in Illustrator. If I’m feeling rather masochistic, I will trace the whole thing with the pen and pencil tools. Any way you go about it, I still enjoy incorporating the corporial sketch into computer graphics. I love you folks.
Channels are the way forward and this is yet another way they make drawing conversion easier, thanks for the tips! I use Illustrator CS3 too and would love to know some of your alternative colouring options as this is all new for me.
Thanks a lot this helps.
Why not simply color under a B/W multiply layer? its simple and it auto darkens any slightly gray areas.
@Ryan, I am not so certain that you actually read the post. What we are presenting here is much more powerful/flexible than simply coloring under a layer set to multiply, thats why we posted it.
Thanks so much for this tutorial. I have been struggling with getting drawings into digital format for a long time, and this is exactly what I needed! I am adding this to my delicious.
As you mentioned,”there a few great alternate approaches that take advantage of Adobe Illustrators vector toolset. Leave a note below if you are interested.”
Have you posted this already? Thankyou
Thank you!
when i right click on the channel thumbnail (step 3), it doesn’t select anything. am i doing something wrong? (kind of a ps n00b here. got cs4.)
I agree with “sam” – I can’t get anything to select during step 3. Therefore, I’m stuck – nothing happens.
The key is not to right click, but command-click. That will convert a channel to a selection. Have fun.
Thank you for your tutorial, it is great. It is good to know different ways to clean the drawings.
Bloody Excellent!! CHEERS!!
Fantastic! I’d love to hear some more about the alternate approaches of using the Adobe Illustrators vector toolset, as well…thanks!
I tried using this for a drawing of mine, but when I right click the preview channel of my grayscaled drawing, it doesn’t give me the select dropdown. Instead, it gives me “Duplicate Channel…”.
you need to hit Ctrl + regular click on the icon for step 3 in windows.. i couldn’t get it to work until i did that.. all was pie after that..
This is one of the most amazing tricks/set ups I have ever used. Blows my mind. Using it for my fashion croquie drawings. Absolutely freakin amazing.