Viewpoint Perspective Trickery With Photoshop
One of the sight gags planned in the World Without Photoshop video was to make MacBook Pro’s look like shiny aluminum “CopyBook” scanners. We needed to replace the keyboard and trackpad with the guts of a flatbed scanner. The image you see above is straight off the camera. The illusion of a scanner bed is just a printed piece of paper sitting over the keyboard. No Photoshop was used in the making of that photograph, however a quick Photoshop trick was used in the making of the image in the photo. The obvious irony being that, like most of the props required to create video, we then needed to use Photoshop’s image distortion powers to pull it off.
This type of optical illusion is categorized as perspectival anamorphosis, and while it dates back to the early Renaissance painters, many people nowadays visually connect it with the work of chalk artists like Kurt Wenner and Julian Beever. If you have access to some really large format printers, you could easily scale this process up to street level. Another option would be to leverage Photoshop for the distortion, and then translate the image back to a drawing.
Step 1: Select a View Angle, Take Picture

The optical illusion essentially requires that you composite something rendered (drawn or photographed) with the real world by merging the points of view. Therefore a good place to start is figuring out what that point of view will be. In our case, we knew that the best possible camera angle for the CopyBook would be looking down into the scanning bed from the direction of the front right corner. From the ideal point of view, and with as much depth of field as possible, you then photograph the object/scene. Personally I find it easier to distort the image later if i keep the orientation of the camera level with the floor.
Step 2: Mask/Cut

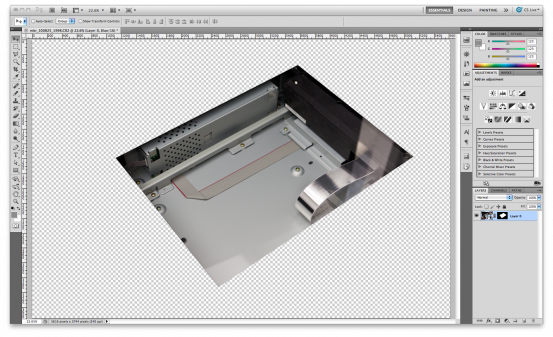
Once you get the image into Photoshop, you need to isolate the part of the image that you intend to integrate back into the physical world. In the image above we have masked out the center of the scanning bed and moved it into its own layer. Since the next step is to distort and stretch the isolated area, it’s in your best interest to try and keep the selection area for your new layer as close to the artwork as possible.
Step 3: Distort

The particulars of this step are going to be slightly different depending on the medium, scale and shape of the illusion you are going for. The general implementation however, should be the same – you are going to rotate and distort the image so that you can print it out flat. The easiest way we have found to do this in Photoshop is to select the appropriate later and use the Distort & Skew Transformations tool located in the menu under: Edit > Transform.
Even with practice, every new illusion requires some trial & error, which in this case equates to a lot printing, placing and looking. It’s easier to start with square or rectangular images being composited into square or rectangular areas. Working with non orthogonal shapes is much easier if you imagine (or even draw) a square rectangle around it while you are working.
Step 4: Install (Place or Draw)
The illusion should compete itself when you place the distorted image into the intended spot (or transfer the distorted image to a drawing in the right spot), and position the viewer back in the initial point of view. Taking a photo or closing one eye often shifts the illusion from pretty good to almost perfect, as our stereo vision tends to keep us from being completely tricked. I did not have any off angle photos of the CopyBook prop, but i think this example (correct and off angle) do a good job illustrating how extreme the distortion need be at times.
Matte printing works better than glossy. There is no real limit to the scale if the effect, but larger endeavors will requite larger prints. Have fun, if you make anything cool, or have a few secrets to share, let us know.


 See more at